• Hi, I am the owner and main administrator of Styleforum. If you find the forum useful and fun, please help support it by buying through the posted links on the forum. Our main, very popular sales thread, where the latest and best sales are listed, are posted HERE

    Purchases made through some of our links earns a commission for the forum and allows us to do the work of maintaining and improving it. Finally, thanks for being a part of this community. We realize that there are many choices today on the internet, and we have all of you to thank for making Styleforum the foremost destination for discussions of menswear.
  • This site contains affiliate links for which Styleforum may be compensated.
  • Last Day to save 20% sitewide at Kirby Allison's annual Father's Day Sale! !

    Kirby Allison is one of Styleforum's original success stories, beginning long ago with Kirby;s Hanger Project. Every year, Kirby holds a Father's Day Sale featuring some of the best accessories and shoe care products in the world. Take this opportunity to get something for your father, grandfather, or yourself, at a rare 20% discount (discount taken automatically at the checkout). See if you find that perfect hanger, shoe cream, or watch case here

    Enjoy

  • STYLE. COMMUNITY. GREAT CLOTHING.

    Bored of counting likes on social networks? At Styleforum, you’ll find rousing discussions that go beyond strings of emojis.

    Click Here to join Styleforum's thousands of style enthusiasts today!

    Styleforum is supported in part by commission earning affiliate links sitewide. Please support us by using them. You may learn more here.

*** The official and awesome DIY thread ***

CoveOps

Member
Joined
Dec 12, 2013
Messages
5
Reaction score
2
I literally just googled "memphis leather shop" and went and looked for something suitably thin. It was like 30 bucks for a pretty big piece, I've made two wallets (one for my dad for father's day) and still have tons left.

Things you will need: leather of your choice, thread, needle, awl, bone folder (or letter opener, or pen- something to crease your folds with), water, towel, pencil, scissors, superglue if you are very lazy like me
smile.gif


I made the pattern out of paper and then traced it onto the leather to cut out. You can also get practice about where the folds go. I can edit dimensions into this post if people really need it, but I just folded the paper around a credit card and gave some space on all sides and went with it. I don't know the measurements but I can measure it if needed
biggrin.gif


main body


crease the main body as shown, fold side flaps over like this.


fold along your diagonal creases (45 degree angle folds btw) into an accordion to make the pockets of the wallet.


cut a coin pocket a little less wide than the middle section of the main wallet, and with the two body sections a bit less "tall" than the height of the rectangle in the middle of the pattern (see first image and its the middle section). make the flap however long you want, some people fold it over all the card slots too. crease as shown.


fold up the pocket and slide it into the middle accordion fold.


you can optionally cut a rectangle the same size as one side of the coin pocket to divide the front card slot into two slots. this is what I did.


slide that into the front accordion fold.


Once you've made this paper version, get out your leather and a pencil. trace the pieces onto the leather and cut them out. you may have to shave down some dimensions due to the leather's thickness, but wait until you've tried putting it together before you cut! losing a millimeter off a side is way better than having to recut or buy more leather.

To fold the leather, put a metal ruler or some kind of straight edge to fold over, then press on the fold with your bone folder or pen or envelope opener or whatever to crease it. It will help if you wet the leather down with a towel before you try to crease it hard. Put the leather wallet together the same way you did the paper. If everything fits together and you don't need to trim anything, you are ready to sew it together!

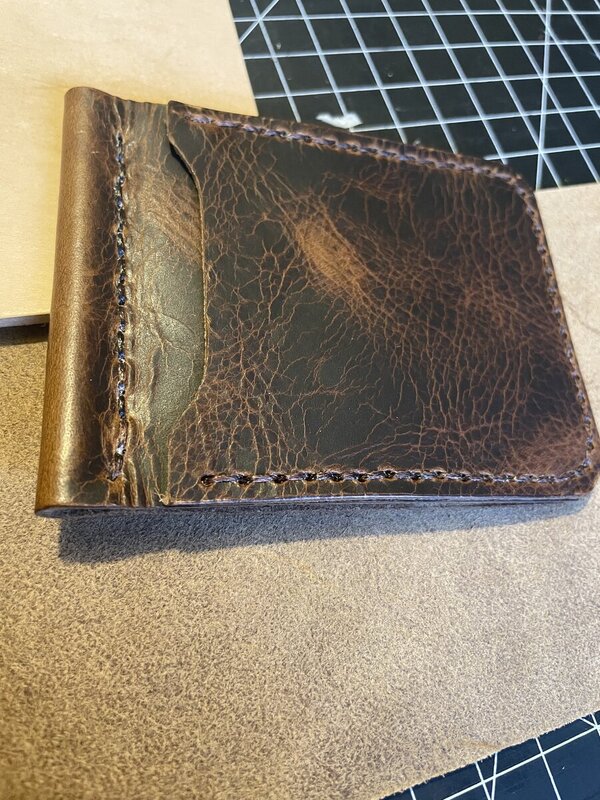
Okay I was wrong in my earlier post, there are 10 stitches in the wallet. basically you just need to punch through the top and bottom of each fold of the accordion and the pocket or divider beneath. This is hard to explain in words, but here is a picture which hopefully helps?


you do the same thing on the other side. you need to then sew through the punched holes. 15 loops should do it. You can try to knot the thread off, but I couldn't find a way to do it inside the fold. I just tucked the end into the fold and put a tiny dot of superglue in there.

I also sewed the top folds together so they wouldn't open as much.


That's really it! You could sew a cross into it if you really want it to be like MA+.

...that was a long post! I expect to see some pictures of you guy's wallets after all that work
lol8[1].gif


It's a really good idea, thanks for sharing!
 

9100RPM

New Member
Joined
Jan 20, 2014
Messages
2
Reaction score
3
What a cool thread! I've been making my own bow ties for a few years now and just wanted to share. Here are a few of my most recent creations.


I borrowed my dad's DSLR and soon after finding a lightbox DIY on youtube, I ended up taking these shots last week. The first two images are the exact same ones, but the left image was produced after a bit hue adjustments.


Hope y'all enjoy!
 
Last edited:

noob in 89

Stylish Dinosaur
Joined
Dec 28, 2010
Messages
11,335
Reaction score
15,635
oAdYyKp.jpg


iUmkymL.jpg


PREVIOUSLY: NOOOOOOOOOO!!!!!!!!!!!!!!!!!!


qHQwx4p.jpg


oAdYyKp.jpg


BnTrCvq.jpg


zS3mRiZ.jpg


bjLEJPy.jpg


** Soles are not as glaringly WHITE! as they appear.


:slayer:


~ AND ALL THINGS OLD ARE NEW AGAIN ~

WINGTIP SAGA: PART III

+


.​
 

MarioImpemba

Distinguished Member
Joined
Apr 20, 2012
Messages
1,096
Reaction score
136
is that yardage or jeans?

Old jeans that I don't wear anymore due to the fit, or falling out of preference.

Repairing other jeans?

That's a start.


I could just Goodwill/Salvation Army them, which is what I normally do with my clothes; always looking for an excuse for a new project, though.

I've seen some pretty dope tool-rolls out of denim; might be the way to go for me. Something I can do with just a needle and thread, right?
 

RXS09

Distinguished Member
Joined
Jan 10, 2013
Messages
1,286
Reaction score
1,817
I recently dyed a pair of my Margiela side zips from Grey to Black. This is a bit of a how to, in case anyone is interested in doing the same.
Cost of boots aside, it's a fairly cheap process but it takes time and patience. I used Fiebing's Leather Dye which I bought from Ebay. I bought the 4oz bottle, which was more than enough. The bottle comes with an applicator, which seemed to work just fine. If anyone needs a link, feel free to send me a PM.

I started by wiping down the entire boot with warm water, ensuring that it was completely ridden of any dirt, excess polish, etc. I laid down a decent amount of paper towels as well, in the case that some spilled.

Cleaned&Before dyeing:


First coat: If anyone decides to do this, be sure that you lightly dip the applicator in the bottle, and apply it in a circular motion. This helps guarantee an even distribution.


Second coat: Not much of a noticeable difference in pictures...


After the second coat, I used a rough rag to wipe off excess dye. (The brand name of the rag escapes me, but they're the same ones I use to work on my bike. The kind of rag that everyone has at least one of laying around in their garage.)
The reason why I opted for a rough rag is that it helps to reduce the shine, as I wanted the boots to have a matte finish. The rougher surface also helps remove excess dye more efficiently than something smoother.

Dried & wiped down:


After they dryed, I also steamed them. I had never done this before, but apparently steaming them was supposed to help remove any remaining gloss. It worked excellently, to my surprise.
Since I did this, they've been worn several times. I'm content with the result, and now I have this overwhelming desire to alter more of my stuff.


What I forgot to mention is that when I did this, I wanted to keep at least one thing from the original boot. I decided to keep the small tab on the back grey.
If anyone has any questions what so ever, feel free to shoot me a PM!


If anyone has any questions what so ever, feel free to shoot me a PM!
 
Last edited:

ChetB

Distinguished Member
Joined
Jun 5, 2011
Messages
4,275
Reaction score
10,380
Just tossed some indigo 3Sixteens into the wash with 1.5 liters of bleach.

Last time I bleached jeans, I soaked them in a bucket for 4 hours. This time I just opened the side-loading machine and poured the bleach in, a few minutes into the cycle. This could end terribly.
 

ChetB

Distinguished Member
Joined
Jun 5, 2011
Messages
4,275
Reaction score
10,380
Yeah, just got bored and decided to do it to another pair using a different method. I accidentally shrunk the first pair and had to retire them.

They turned out several shades lighter, but not stone-wash light. The fade is more or less even, too, instead of the splotches I got from the bucket method (which I kind of liked). I may do some more bleaching later, but first I'll let them dry and take some pics.
 
Last edited:

Featured Sponsor

Do You Have a Signature Fragrance?

  • Yes, I have a signature fragrance I wear every day

  • Yes, I have a signature fragrance but I don't wear it daily

  • No, I have several fragrances and rotate through them

  • I don't wear fragrance


Results are only viewable after voting.

Forum statistics

Threads
509,934
Messages
10,615,016
Members
225,074
Latest member
Indole
Top