• Hi, I am the owner and main administrator of Styleforum. If you find the forum useful and fun, please help support it by buying through the posted links on the forum. Our main, very popular sales thread, where the latest and best sales are listed, are posted HERE

    Purchases made through some of our links earns a commission for the forum and allows us to do the work of maintaining and improving it. Finally, thanks for being a part of this community. We realize that there are many choices today on the internet, and we have all of you to thank for making Styleforum the foremost destination for discussions of menswear.
  • This site contains affiliate links for which Styleforum may be compensated.
  • STYLE. COMMUNITY. GREAT CLOTHING.

    Bored of counting likes on social networks? At Styleforum, you’ll find rousing discussions that go beyond strings of emojis.

    Click Here to join Styleforum's thousands of style enthusiasts today!

    Styleforum is supported in part by commission earning affiliate links sitewide. Please support us by using them. You may learn more here.

2019 shoe revival challenge - submit entries HERE

suitforcourt

Distinguished Member
Joined
Jan 11, 2012
Messages
8,242
Reaction score
19,659
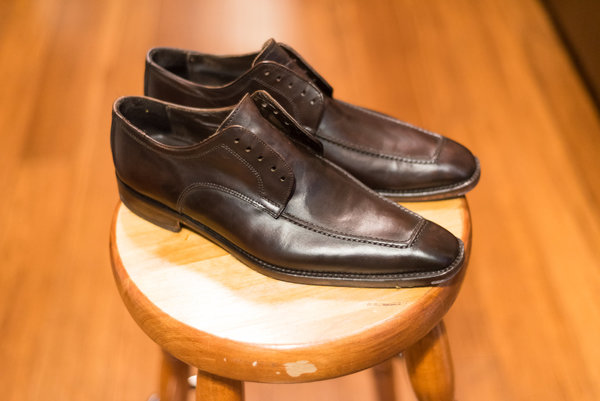
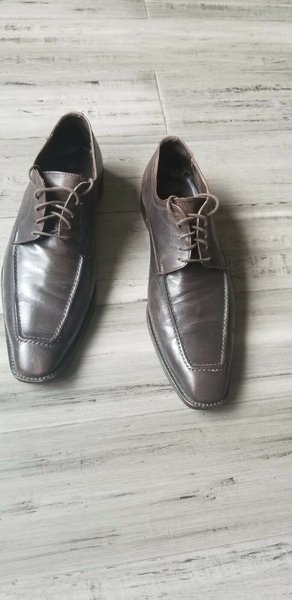
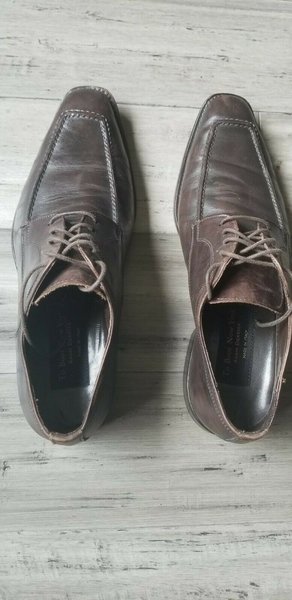
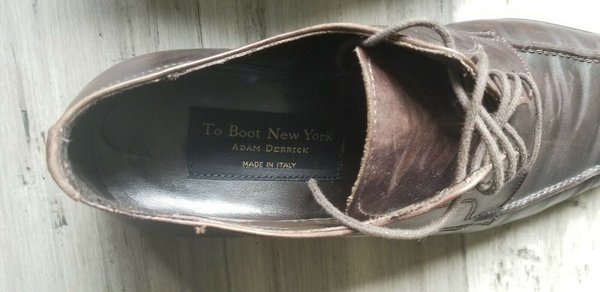
This is the official thread for submissions to the 2019 shoe revival challenge.

Rules:

1. This thread shall remain open until September 6, 2019, 12am EST. Any entries submitted after this time, will not be considered;

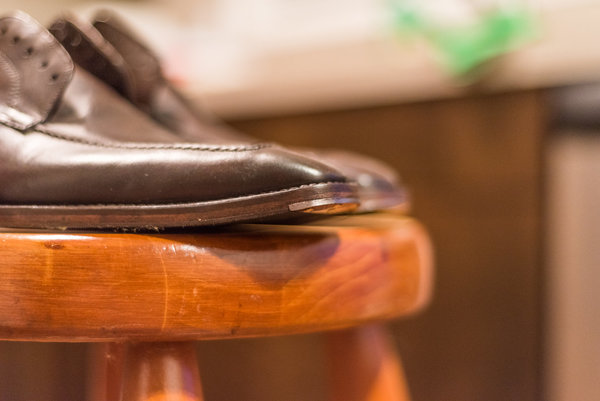
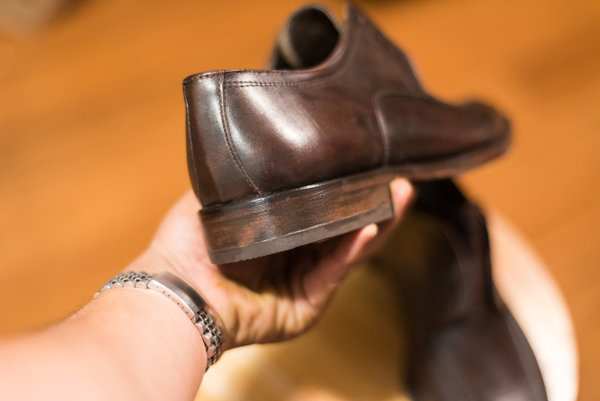
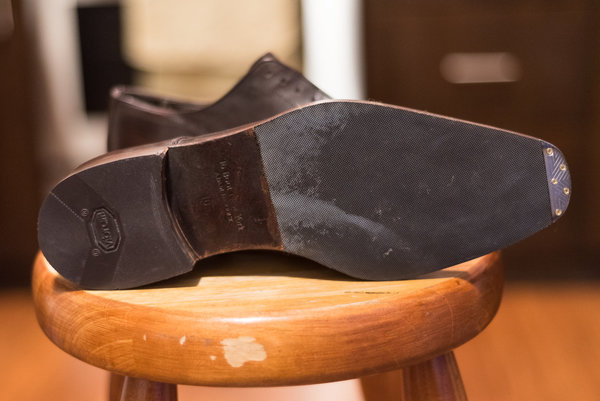
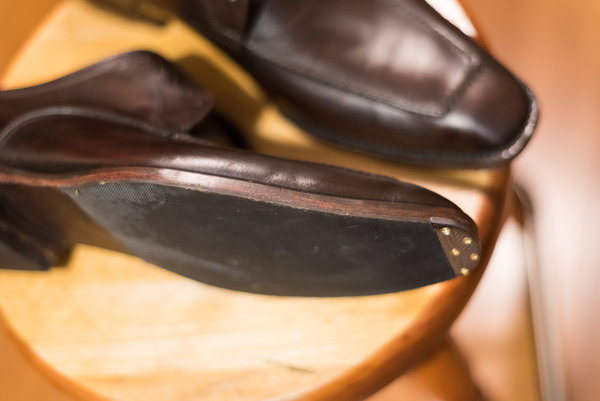
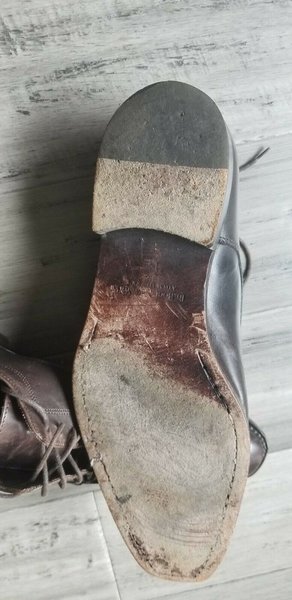
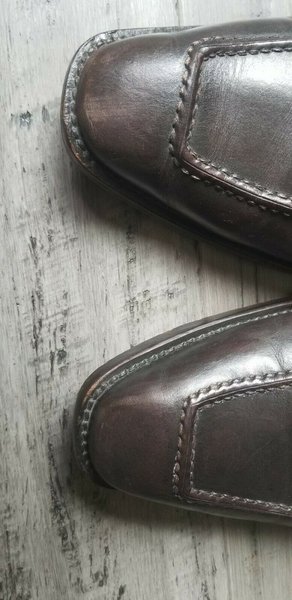
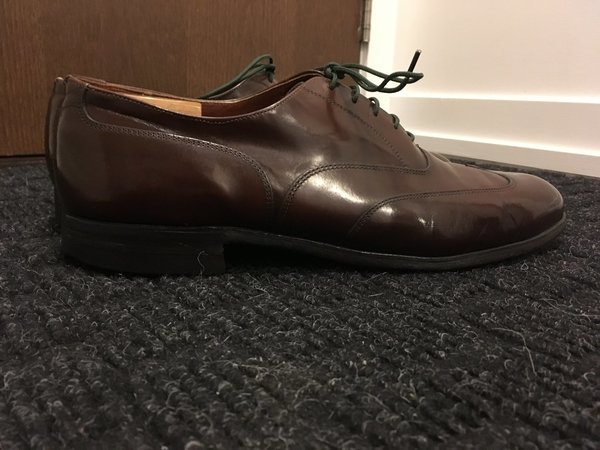
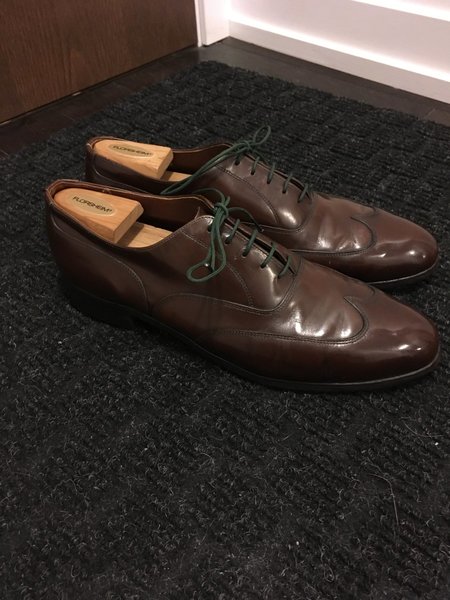
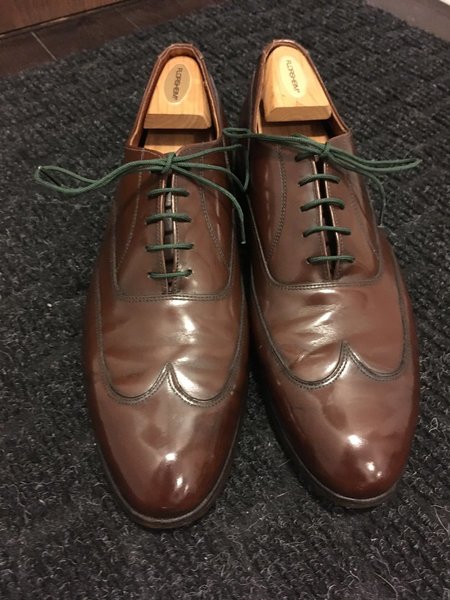
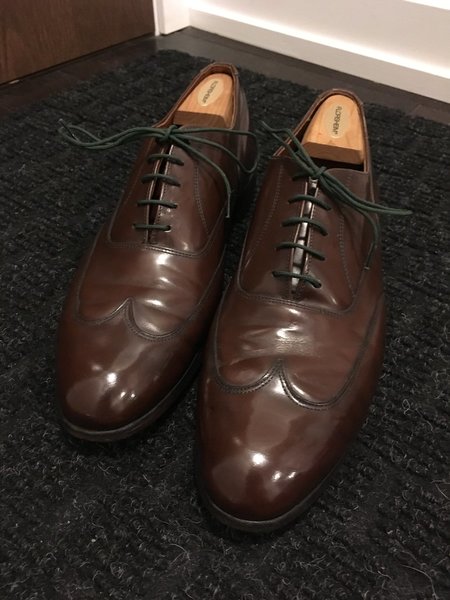
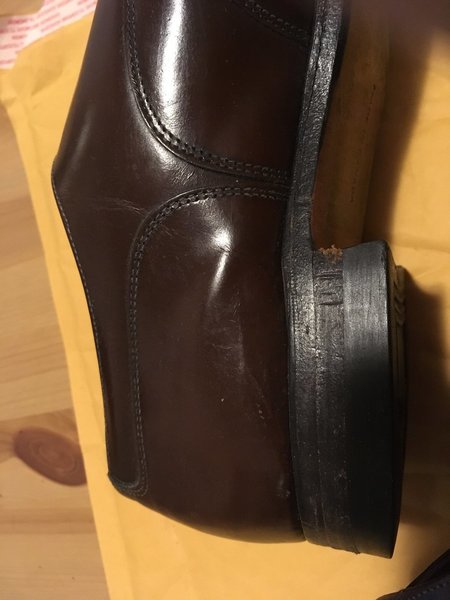
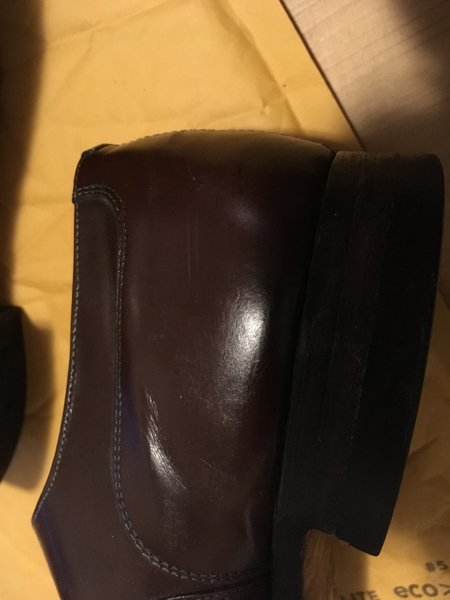
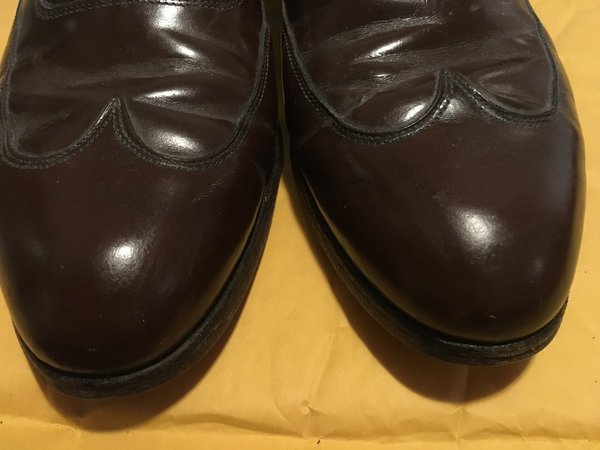
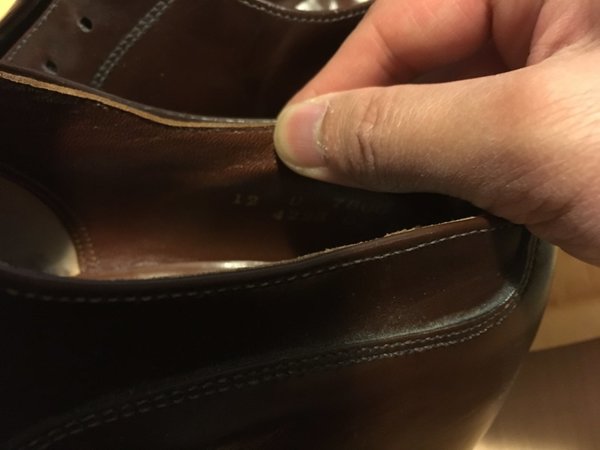
2. Every entry must submit at least 6 before, and at least 6 after pictures. More is fine. Less is not;

3. Every participant can submit 1 pair of shoes for consideration.

Good luck to all. And have fun!!!


-------------------------

The rules once again:

Rules of the challenge:
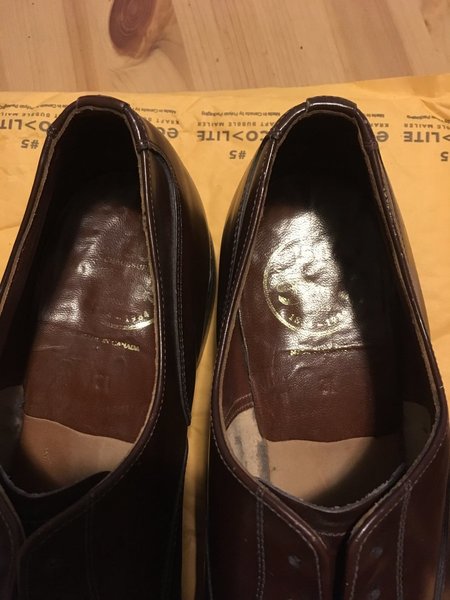
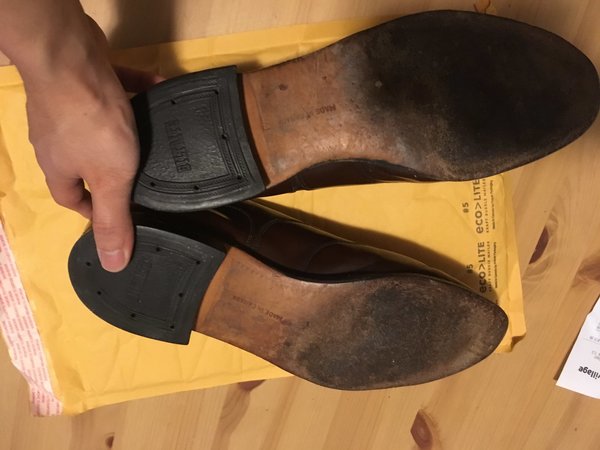
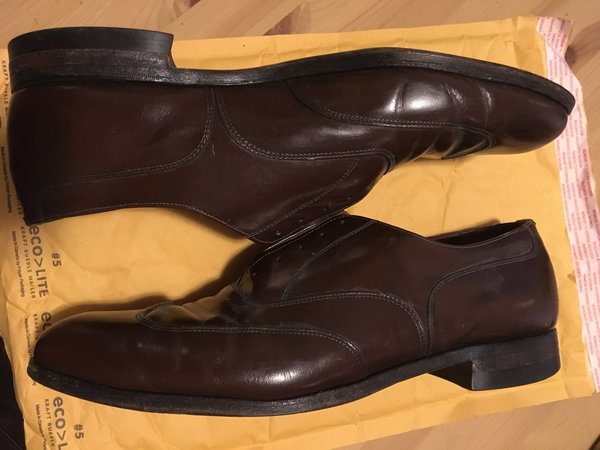
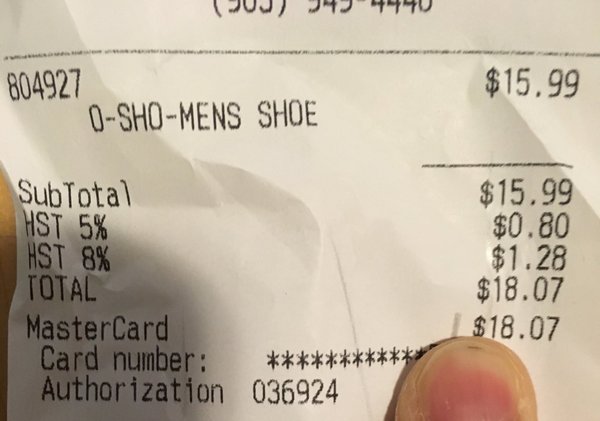
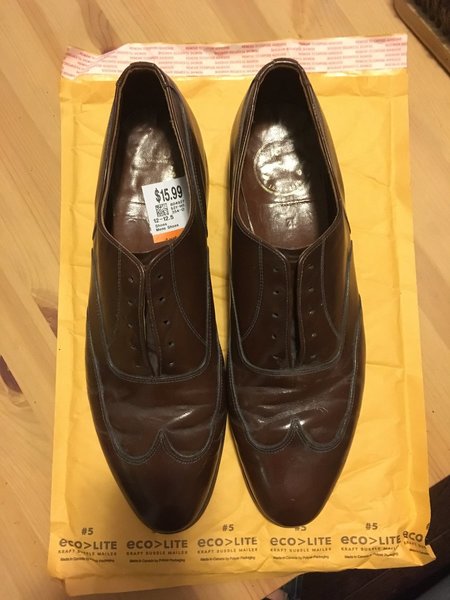
  1. Purchase shoes for $17.50 USD or less (taxes, shipping, and other online or credit card fees are excluded). Must have receipt (must be used but does not have to be vintage). The receipt must show the following: date of purchase, and price;
  2. Receipt must show date and time AFTER August 6, 2019 10:30am EST;
  3. All work must be done by yourself;
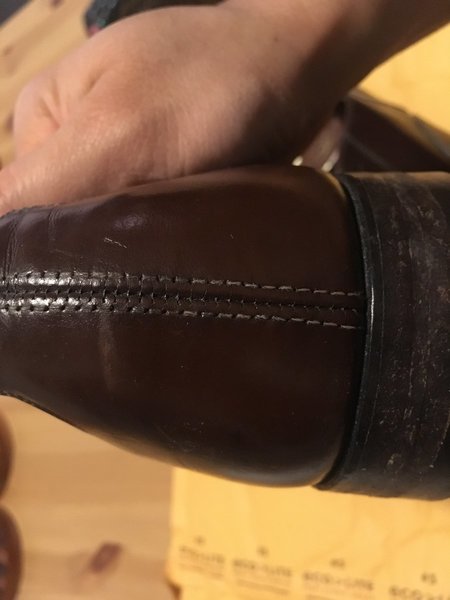
  4. Before and after photos must be taken - minimum 6 before and 6 after. More is fine. Less is not;
  5. Full explanation of steps taken, and work done. Points are allotted on that basis;
  6. Participants may enter more than one pair of shoes, BUT only one pair will be used for the competition. Make it clear which pair you are using for same;
  7. Contest ends September 6 at 12am EST. This longer time line is to encourage international participants who may have extended shipping times to receive shoes.
 

Thomas Crown

Distinguished Member
Joined
Nov 25, 2017
Messages
1,824
Reaction score
9,302
My submission for this year’s challenge-a pair of Florsheim Imperial short wings from either ‘79 or ‘89.The condition was decent and the soles/heels/interior had no major issues. I had been intrigued since last year with @Shoonoob ’s correct-a-bucks and thought I’d give a go at some spectators—the BEFORE:
0FE7B580-1E23-419A-97B3-68F8EABBC806.jpeg
EFDBC376-AAFC-42B3-A61C-276094377B70.jpeg
D849AEED-95C7-4DC0-869D-255408A5C03E.jpeg
2D89A925-C3FC-4B78-B45C-C6183110567F.jpeg
08DEBE9E-94F4-49EB-9512-5B3A5C106EEA.jpeg
ECCA374A-38CC-4482-97D6-B0B550E8F263.jpeg
E10C781D-FE89-4F43-A0EE-AF62F5F98C7A.jpeg
9D3677FD-A58E-4180-85BA-18C3726FE215.jpeg
A4780AA5-7529-49D3-8A8B-3CCB67F03B31.jpeg

The process:
-alcohol wipedown insoles
-Bick 4 bath all around
-reshape with wet paper towel
over shoe tree method
-acetone removal of excess CG
and polish
- coarse grit sandpaper to remove
portions of finished leather to expose nubuck on vamp and sides
- medium to fine grit sandpaper to
finish
-AE dark brown shoe cream on toe
and heels
-neutral wax on toes
-Brush and buff with nylon stocking
-sonicare cleaning on welts
-dark brown edge dressing
-new laces
75BE312F-654D-4A85-B26A-505B2BD275B3.jpeg
4606B697-15E1-4162-B30E-EB0573C6B742.jpeg
0A3FFE89-A608-41E4-AC74-5EBDC42CCE48.jpeg
F131C433-B8A2-4D3F-BA49-4BC84B925F43.jpeg
C5BE9AE1-3F81-4CF7-814E-30E827BB74A8.jpeg
F0C50C6F-22CA-4229-A093-F2E03C252F1F.jpeg
9FE8B39B-A438-488F-BADC-96F43BF805FE.jpeg
A8EE6FA7-81C0-49EF-B35F-E8768622FFF3.jpeg
F5FD4EB3-579B-433B-805C-2ED58DBD846C.jpeg
78C71FF4-6270-4399-8781-93C68A36648C.jpeg
 

Attachments

  • 4AF36B75-923D-48EF-9600-7107D2675583.jpeg
    4AF36B75-923D-48EF-9600-7107D2675583.jpeg
    269.2 KB · Views: 8

suitforcourt

Distinguished Member
Joined
Jan 11, 2012
Messages
8,242
Reaction score
19,659
My submission for this year’s challenge-a pair of Florsheim Imperial short wings from either ‘79 or ‘89.The condition was decent and the soles/heels/interior had no major issues. I had been intrigued since last year with @Shoonoob ’s correct-a-bucks and thought I’d give a go at some spectators—the BEFORE: View attachment 1235375 View attachment 1235374 View attachment 1235376 View attachment 1235381 View attachment 1235384 View attachment 1235383 View attachment 1235382 View attachment 1235380 View attachment 1235379
The process:
-alcohol wipedown insoles
-Bick 4 bath all around
-reshape with wet paper towel
over shoe tree method
-acetone removal of excess CG
and polish
- coarse grit sandpaper to remove
portions of finished leather to expose nubuck on vamp and sides
- medium to fine grit sandpaper to
finish
-AE dark brown shoe cream on toe
and heels
-neutral wax on toes
-Brush and buff with nylon stocking
-sonicare cleaning on welts
-dark brown edge dressing
-new laces
View attachment 1235394 View attachment 1235396 View attachment 1235397 View attachment 1235398 View attachment 1235399 View attachment 1235400 View attachment 1235402 View attachment 1235403 View attachment 1235404 View attachment 1235405

And the first entry comes in with a BOOM.

@Shoonoob will be proud of the legacy he is leaving on this community.
 

mreams99

Distinguished Member
Joined
Jan 9, 2015
Messages
6,272
Reaction score
29,696
It’s definitely a great start!
 

florent

Senior Member
Joined
May 11, 2016
Messages
542
Reaction score
4,486
Congrats @Thomas Crown for kicking this off, and thanks @suitforcourt for the whole organization!

Here is my application with a pair of Church's Diplomat II from, I would guess, the 60's.
Receipt (here is the original listing)

c2Qk97Ol.png


The obvious issues with these shoes where the roten soles stitching which made the soles completely falling apart, the severe misshape and a very dry and "lifeless" leather.

The Before :

kiszjphh.jpg


08cvVnBh.jpg


8OOtDybh.jpg


F5VXRvHh.jpg


Yo6vdvyh.jpg


ERV1ZdWh.jpg


xFAAGlDh.jpg


The Process:

  1. Dismantling of the heels, soles and cork
  2. New cork
  3. Full handstitched resole under closed channel
  4. Flush metal toe tips
  5. New heel tops
  6. Edges finished with wax and hot iron
  7. Sole finish with liquid wax
  8. Restitching of a facings base stitch (does it have a name?)
  9. Several rounds of light dyeing to give the leather a museum effect
  10. Neutral cream
  11. Mirror shine
  12. Original laces cleaned in the laundry
Everything was made at home by hand (only machines used was a Dremel to pre-drill toe tips screw holes and a washing machine for cleaning the laces ? )

Here are some pics of the process if anyone is curious.

The Result

JntYXvuh.jpg


72ZMSNQh.jpg


mBAPvBih.jpg


Llveo46h.jpg


cMZm5yDh.jpg


yrjhtrPh.jpg


dsTgIpTh.jpg


AeP846th.jpg
 

stook1

Master Builder
Joined
Jul 2, 2015
Messages
3,923
Reaction score
10,358
Congrats @Thomas Crown for kicking this off, and thanks @suitforcourt for the whole organization!

Here is my application with a pair of Church's Diplomat II from, I would guess, the 60's.
Receipt (here is the original listing)

c2Qk97Ol.png


The obvious issues with these shoes where the roten soles stitching which made the soles completely falling apart, the severe misshape and a very dry and "lifeless" leather.

The Before :

kiszjphh.jpg


08cvVnBh.jpg


8OOtDybh.jpg


F5VXRvHh.jpg


Yo6vdvyh.jpg


ERV1ZdWh.jpg


xFAAGlDh.jpg


The Process:

  1. Dismantling of the heels, soles and cork
  2. New cork
  3. Full handstitched resole under closed channel
  4. Flush metal toe tips
  5. New heel tops
  6. Edges finished with wax and hot iron
  7. Sole finish with liquid wax
  8. Restitching of a facings base stitch (does it have a name?)
  9. Several rounds of light dyeing to give the leather a museum effect
  10. Neutral cream
  11. Mirror shine
  12. Original laces cleaned in the laundry
Everything was made at home by hand (only machines used was a Dremel to pre-drill toe tips screw holes and a washing machine for cleaning the laces ? )

Here are some pics of the process if anyone is curious.

The Result

JntYXvuh.jpg


72ZMSNQh.jpg


mBAPvBih.jpg


Llveo46h.jpg


cMZm5yDh.jpg


yrjhtrPh.jpg


dsTgIpTh.jpg


AeP846th.jpg

Very impressive! Well done!
 

woofmang

Distinguished Member
Joined
Feb 23, 2019
Messages
3,243
Reaction score
14,311
Congrats @Thomas Crown for kicking this off, and thanks @suitforcourt for the whole organization!

Here is my application with a pair of Church's Diplomat II from, I would guess, the 60's.
Receipt (here is the original listing)

c2Qk97Ol.png


The obvious issues with these shoes where the roten soles stitching which made the soles completely falling apart, the severe misshape and a very dry and "lifeless" leather.

The Before :

kiszjphh.jpg


08cvVnBh.jpg


8OOtDybh.jpg


F5VXRvHh.jpg


Yo6vdvyh.jpg


ERV1ZdWh.jpg


xFAAGlDh.jpg


The Process:

  1. Dismantling of the heels, soles and cork
  2. New cork
  3. Full handstitched resole under closed channel
  4. Flush metal toe tips
  5. New heel tops
  6. Edges finished with wax and hot iron
  7. Sole finish with liquid wax
  8. Restitching of a facings base stitch (does it have a name?)
  9. Several rounds of light dyeing to give the leather a museum effect
  10. Neutral cream
  11. Mirror shine
  12. Original laces cleaned in the laundry
Everything was made at home by hand (only machines used was a Dremel to pre-drill toe tips screw holes and a washing machine for cleaning the laces ? )

Here are some pics of the process if anyone is curious.

The Result

JntYXvuh.jpg


72ZMSNQh.jpg


mBAPvBih.jpg


Llveo46h.jpg


cMZm5yDh.jpg


yrjhtrPh.jpg


dsTgIpTh.jpg


AeP846th.jpg
What a transformation!
 

Thomas Crown

Distinguished Member
Joined
Nov 25, 2017
Messages
1,824
Reaction score
9,302
Congrats @Thomas Crown for kicking this off, and thanks @suitforcourt for the whole organization!

Here is my application with a pair of Church's Diplomat II from, I would guess, the 60's.
Receipt (here is the original listing)

c2Qk97Ol.png


The obvious issues with these shoes where the roten soles stitching which made the soles completely falling apart, the severe misshape and a very dry and "lifeless" leather.

The Before :

kiszjphh.jpg


08cvVnBh.jpg


8OOtDybh.jpg


F5VXRvHh.jpg


Yo6vdvyh.jpg


ERV1ZdWh.jpg


xFAAGlDh.jpg


The Process:

  1. Dismantling of the heels, soles and cork
  2. New cork
  3. Full handstitched resole under closed channel
  4. Flush metal toe tips
  5. New heel tops
  6. Edges finished with wax and hot iron
  7. Sole finish with liquid wax
  8. Restitching of a facings base stitch (does it have a name?)
  9. Several rounds of light dyeing to give the leather a museum effect
  10. Neutral cream
  11. Mirror shine
  12. Original laces cleaned in the laundry
Everything was made at home by hand (only machines used was a Dremel to pre-drill toe tips screw holes and a washing machine for cleaning the laces ? )

Here are some pics of the process if anyone is curious.

The Result

JntYXvuh.jpg


72ZMSNQh.jpg


mBAPvBih.jpg


Llveo46h.jpg


cMZm5yDh.jpg


yrjhtrPh.jpg


dsTgIpTh.jpg


AeP846th.jpg
Great job! Very impressive to do something so ambitious with minimal technology and having such spectacular results! Judging from the “London New York” labeling those are some true vintage Church’s,beautiful shoes!
 

mreams99

Distinguished Member
Joined
Jan 9, 2015
Messages
6,272
Reaction score
29,696
CCE07EB9-51CB-4213-9347-F1699F59851A.jpeg
I bought the Executive Imperials that I wanted to work on last year (but the seller would not budge below $15.95). They were still for sale and I bought them for $14.
86E4C979-4EE3-4BB5-A7A4-79145D0FAD82.jpeg


I liked the austerity brogue design. The uppers looked neglected. The heels and soles still looked good, although I decided to apply a sole protector. I figured that if I was going to do a bunch of work on them, I didn’t want the sole wearing out right away.

DC87398E-45B2-4E8A-B8CD-BC874F976747.jpeg

5A1189B9-D821-4586-8593-18498A0849CB.jpeg
B4791629-F5DD-47B3-A3A1-BAF3E580B0A1.jpeg
A7A0E7E9-646D-4F32-BB86-694C4A597D6A.jpeg
2C578199-FEA1-4275-BA64-A50E04501B48.jpeg
760282BB-13F8-4332-8227-54B82A4BF10D.jpeg
E5151FB0-3F0B-464F-8201-02A4F1E160B3.jpeg


I went after these with some acetone and the dark brown finish came right off. It left behind a reddish layer that appeared to be some sort of corrected grain finish. This took more acetone and scrubbing, but it too came off.

I finished this step by thoroughly scrubbing with isopropyl alcohol/water to further help remove the wrinkles.

D02B4BB9-DDBA-485C-9332-441784E37E23.jpeg
C0B1FAAB-E0A3-4714-987E-2F46B6528F1A.jpeg


Now came the fun part. The theme of these shoes was “autumn.” I applied a mix of dyes with a slight greenish tint using a sponge to the heel and wingtip. This was actually three “coats” of various mixed shades, followed by another that was more brownish.
The main part of the shoe had something similar done, but with a slightly reddish tint of light brown. This was finished with a hand scrubbed coat of dye using a small scrap of sponge.

The sole bottom was sanded, and cleaned with isopropyl alcohol prior to installing the sole protector. I chose a tan sole protector so that it would be a similar color as the sole.

I did not think that the original black sole edge would look as good with this lighter shade of brown. I wanted a medium shade of brown, but found that the heel stack had a black layer above a thick black rubber bottom. I decided that a dark brown would be less jarring visually with that black, so I dyed the edge brown and finished with two coats of chili edge dressing.

They were finished with cream conditioner, followed up with wax.

CC5DC5EE-B469-4C8A-8E20-0E6500186975.jpeg
929D2946-87DD-4DFD-89B0-96559B4ACF3B.jpeg
70E53974-07AC-416A-9D07-BA84CE1B163D.jpeg
F11E1962-C967-4577-806E-2CAEC99AF9E3.jpeg
ED0E264B-7A40-4039-BC94-59E280B5D11B.jpeg
B346755A-1B18-45D4-9ED1-62B818C9E60B.jpeg
BE76A30D-52B6-473E-9D4E-2F493BE36A79.jpeg

CCE07EB9-51CB-4213-9347-F1699F59851A.jpeg
 
Last edited:

Thomas Crown

Distinguished Member
Joined
Nov 25, 2017
Messages
1,824
Reaction score
9,302
I bought the Executive Imperials that I wanted to work on last year (but the seller would not budge below $15.95). They were still for sale and I bought them for $14.
View attachment 1235765

The uppers looked neglected. The heels and soles still looked good, although I decided to apply a sole protector. I figured that if I was going to do a bunch of work on them, I didn’t want the sole wearing out right away.

View attachment 1235767
View attachment 1235769 View attachment 1235770 View attachment 1235771 View attachment 1235772 View attachment 1235774 View attachment 1235773

I went after these with some acetone and the dark brown finish came right off. It left behind a reddish layer that appeared to be some sort of corrected grain finish. This took more acetone and scrubbing, but it too came off.

I finished this step by thoroughly scrubbing with isopropyl alcohol/water to further help remove the wrinkles.

View attachment 1235775 View attachment 1235776

Now came the fun part. The theme of these shoes was “autumn.” I applied a mix of dyes with a slight greenish tint using a sponge to the heel and wingtip. This was actually three “coats” of various mixed shades, followed by another that was more brownish.
The main part of the shoe had something similar done, but with a slightly reddish tint of light brown. This was finished with a hand scrubbed coat of dye using a small scrap of sponge.

I did not think that the original black sole edge would look as good with this lighter shade of brown. I wanted a medium shade of brown, but found that the heel stack had a black layer above a thick black rubber bottom. I decided that a dark brown would be less jarring visually with that black, so I dyed the edge brown and finished with two coats of chili edge dressing.

They were finished with cream conditioner, followed up with wax.

View attachment 1235785 View attachment 1235786 View attachment 1235787 View attachment 1235788 View attachment 1235789 View attachment 1235791 View attachment 1235793
Beautiful transformation-the toe cap patina looks like one of my dad’s briarwood pipes!
 

woofmang

Distinguished Member
Joined
Feb 23, 2019
Messages
3,243
Reaction score
14,311
View attachment 1235802 I bought the Executive Imperials that I wanted to work on last year (but the seller would not budge below $15.95). They were still for sale and I bought them for $14.
View attachment 1235765

I liked the austerity brogue design. The uppers looked neglected. The heels and soles still looked good, although I decided to apply a sole protector. I figured that if I was going to do a bunch of work on them, I didn’t want the sole wearing out right away.

View attachment 1235767
View attachment 1235769 View attachment 1235770 View attachment 1235771 View attachment 1235772 View attachment 1235774 View attachment 1235773

I went after these with some acetone and the dark brown finish came right off. It left behind a reddish layer that appeared to be some sort of corrected grain finish. This took more acetone and scrubbing, but it too came off.

I finished this step by thoroughly scrubbing with isopropyl alcohol/water to further help remove the wrinkles.

View attachment 1235775 View attachment 1235776

Now came the fun part. The theme of these shoes was “autumn.” I applied a mix of dyes with a slight greenish tint using a sponge to the heel and wingtip. This was actually three “coats” of various mixed shades, followed by another that was more brownish.
The main part of the shoe had something similar done, but with a slightly reddish tint of light brown. This was finished with a hand scrubbed coat of dye using a small scrap of sponge.

The sole bottom was sanded, and cleaned with isopropyl alcohol prior to installing the sole protector. I chose a tan sole protector so that it would be a similar color as the sole.

I did not think that the original black sole edge would look as good with this lighter shade of brown. I wanted a medium shade of brown, but found that the heel stack had a black layer above a thick black rubber bottom. I decided that a dark brown would be less jarring visually with that black, so I dyed the edge brown and finished with two coats of chili edge dressing.

They were finished with cream conditioner, followed up with wax.

View attachment 1235785 View attachment 1235786 View attachment 1235787 View attachment 1235788 View attachment 1235789 View attachment 1235791 View attachment 1235793
View attachment 1235802
Nice job!
 

stook1

Master Builder
Joined
Jul 2, 2015
Messages
3,923
Reaction score
10,358
View attachment 1235802 I bought the Executive Imperials that I wanted to work on last year (but the seller would not budge below $15.95). They were still for sale and I bought them for $14.
View attachment 1235765

I liked the austerity brogue design. The uppers looked neglected. The heels and soles still looked good, although I decided to apply a sole protector. I figured that if I was going to do a bunch of work on them, I didn’t want the sole wearing out right away.

View attachment 1235767
View attachment 1235769 View attachment 1235770 View attachment 1235771 View attachment 1235772 View attachment 1235774 View attachment 1235773

I went after these with some acetone and the dark brown finish came right off. It left behind a reddish layer that appeared to be some sort of corrected grain finish. This took more acetone and scrubbing, but it too came off.

I finished this step by thoroughly scrubbing with isopropyl alcohol/water to further help remove the wrinkles.

View attachment 1235775 View attachment 1235776

Now came the fun part. The theme of these shoes was “autumn.” I applied a mix of dyes with a slight greenish tint using a sponge to the heel and wingtip. This was actually three “coats” of various mixed shades, followed by another that was more brownish.
The main part of the shoe had something similar done, but with a slightly reddish tint of light brown. This was finished with a hand scrubbed coat of dye using a small scrap of sponge.

The sole bottom was sanded, and cleaned with isopropyl alcohol prior to installing the sole protector. I chose a tan sole protector so that it would be a similar color as the sole.

I did not think that the original black sole edge would look as good with this lighter shade of brown. I wanted a medium shade of brown, but found that the heel stack had a black layer above a thick black rubber bottom. I decided that a dark brown would be less jarring visually with that black, so I dyed the edge brown and finished with two coats of chili edge dressing.

They were finished with cream conditioner, followed up with wax.

View attachment 1235785 View attachment 1235786 View attachment 1235787 View attachment 1235788 View attachment 1235789 View attachment 1235791 View attachment 1235793
View attachment 1235802

Impeccable dye work! I have a LOT to learn.
 

actionjbone

Senior Member
Joined
Jan 16, 2018
Messages
575
Reaction score
2,146
I wasn't originally planning to compete, but then I had quite the haul at the thrift store this weekend. (50% off EVERYTHING.)

receipt.jpg

One of my favorite things is taking something utterly destroyed and making it absolutely gorgeous. For example, I interviewed for my current job wearing a pair that I'd brought back from the grave.

So when I found these - for $3! - I knew I had to do something with them.

top.jpg

This was an utterly ruined pair of Florsheims. I don't even know why they were put up for sale, and not just binned.

There are no identifying markings left anywhere on the uppers or insoles. I only know they're Florsheim based on the heel logo, though I've never seen another pair of Florsheims with that logo on the heel. I figure that means either they're old, or they were unpopular.

bottom.jpg

And speaking of the sole, it's cemented and it was starting to come off in places.

damage.jpg

In spite of their appearance, they were smooth leather - not suede or nubuck. The finish was simply destroyed. And they're unlined, so they had even less internal structure than you might expect.

detail2.jpg

The surface was a complete mess. Stains were everywhere.

detail.jpg

These shoes had very clearly NEVER been cared for.

left.jpg

And did I mention they were in bad shape?

back.jpg

This is the most miserable pair of shoes I've ever worked on, which also means it was one of the most interesting challenges.

Here's everything I did, in order. Note that whenever I applied a coat of something, it was with my bare finger unless otherwise specified; all brushing/shining/buffing was with a Red Wing brand horsehair shoe brush (no rags or daubers or anything).
  • Cleaned and reshaped shoes
    1. Brushed the shoes and soles thoroughly
    2. Immersed the shoes in a tub of water for around 30 minutes
    3. Removed shoes from water, gently dried with a terrycloth towel
    4. Inserted form-fitting spring-form cedar shoe trees
    5. Placed shoes at a 30-degree incline over a wire mesh next to a cold-air vent for 24 hours (the incline is necessary to prevent the leather soles from getting damaged)
    6. After about two hours, removed cedar shoe trees and inserted form-fitting rigid hardwood trees (and placed cedar trees in front of the vent next to the shoes)
    7. Waited a day; shoes and soles and cedar trees had completely dried (inside and out)
    8. Swapped the cedar spring-form shoe trees back in
    9. Gently sanded the worst/roughest spots - mainly the left toe, the left vamp, and a couple smaller spots around the side/back.
    10. Wiped the shoes gently with acetone, partly to remove some stains and partly in case there happened to be any old polish to strip off. (There wasn't.)
    11. Using rotary face brush, applied a generous amount of Bick 1 leather cleaner to uppers
    12. Waited for shoes to air-dry
    13. Brushed thoroughly
  • Dyed shoes
    1. Applied three generous coats of Angelus brand Jade (green) leather dye with dauber
    2. Waited several minutes for shoes to dry and dye to begin to set
    3. Applied one very thin coat of neutral VSC
    4. Brushed gently
    5. Applied one very thin coat of neutral Tarrago cream polish
    6. Brushed a little less gently
    7. Saturated shoes with Fiebling's neatsfoot oil - I'm talking really, really saturated them. I applied many coats using a rag; I'd go over one shoe, then the other, then continued back and forth until no more was getting absorbed and the oil started to pool on the surface
    8. Left shoes to rest for a full day, to allow the last of the oil to absorb in and all the color to even out
I've developed this dying technique over time to help balance the color and to make it really penetrate the leather. The neatsfoot blends with the dye and drags it deeper in, while simultaneously spreading the dye around as the oil spreads - it's sort of like how CXL leather works, but without the hot stuffing and without quite as much permanence.

Anyway, continuing:
  • Polished shoes
    1. Applied thin coat of neutral VSC
    2. Buffed
    3. Applied thin coat of neutral Tarrago cream
    4. Buffed
    5. Applied thin coat of neutral Collonil 1909
    6. Waited for product to dry
    7. Buffed
    8. Applied another thin coat of neutral Collonil 1909
    9. Waited for product to dry
    10. Buffed
  • Shined shoes
    • At this point, I started to work more based on feel/sight
    • I repeatedly applied many, many very thin coats of neutral VSC, Tarrago cream, Collonil 1909, and Allen Edmonds carnauba wax
    • I brushed heavily between each coat, to spread it around evenly and really work it into the leather.
    • I chose each product based on how the shoes appeared after the previous coat, how dry/tacky the shoes felt, and what I wanted to gain from the next coat: suppleness, pure shine, or smoothness.
    • I probably did this for a couple hours, not including time waiting for the Collonil to dry. I lost count of the number of coats I applied.
    • I did this because the leather had been in such rough shape, I wanted to ensure I gave the shoes lots of waxes to absorb, as well as a durable but flexible coating.
    • Finished with two final coats of Collonil, then lots of buffing.
  • Waited another day for shoes to dry
At this point, I had thought about sanding down the entire sole edge to the natural leather, but I realized the sole edges would've absorbed too much green dye. So I came up with a plan B.
  • Dressed sole edges
    1. Wrapped low-tack painter's tape around both shoes
    2. Gently sanded edges all around
    3. Coarsely sanded heel risers, partly by hand and partly with dremel, to remove dark brown dressing around riser
    4. Removed painter's tape from shoes; wrapped masking tape around all except the very top of heel risers
    5. Applied three coats of black edge dressing around soles' edges
    6. Waited for edge dressing to dry
    7. Removed masking tape from heels
    8. Applied a generous coat of Bick 4 to now-bare heel risers
    9. Buffed
    10. Applied a coat of neutral Tarrago cream to heel risers
    11. Buffed
    12. Applied another coat of Bick 4 to heel risers
    13. Buffed
  • Finished up
    • Pushed a little Barge into the loose parts of the sole, to reattach (fortunately, there weren't any deep spots)
    • Applied two more coats of Collonil; buffed briskly after each coat
    • Laced shoes
    • Decided I didn't like the lacing; laced them again, differently
And the result?

top.jpg

I'd wear these on a job interview, if only they were my size.

detail.jpg

Now, all the texture adds interest. The darker and lighter areas, the peaks and valleys - they create a unique patina, so the shoes look different from every angle.

right.jpg
left1.jpg

The heels transition from green leather to black edges, then natural leather stacks, then finally to the tan rubber pad.

heel.jpg

These looked stunning in sunlight yesterday, but it was overcast today, so unfortunately I couldn't get photos of the light reflecting off. (If anyone wants to see, I'll try to grab more photos this weekend.)

left2.jpg right.jpg

So, that's my entry.

These shoes were once trash. Now they're not.
 
Last edited:

Featured Sponsor

How important is full vs half canvas to you for heavier sport jackets?

  • Definitely full canvas only

    Votes: 91 37.9%
  • Half canvas is fine

    Votes: 89 37.1%
  • Really don't care

    Votes: 25 10.4%
  • Depends on fabric

    Votes: 39 16.3%
  • Depends on price

    Votes: 37 15.4%

Forum statistics

Threads
506,796
Messages
10,591,946
Members
224,312
Latest member
Sharkysteph
Top